Puppet 4: Working with Modules and Classes
UNDERSTANDING MODULES AND CLASSES
About Me !

 |
 |
 |
Module Overview
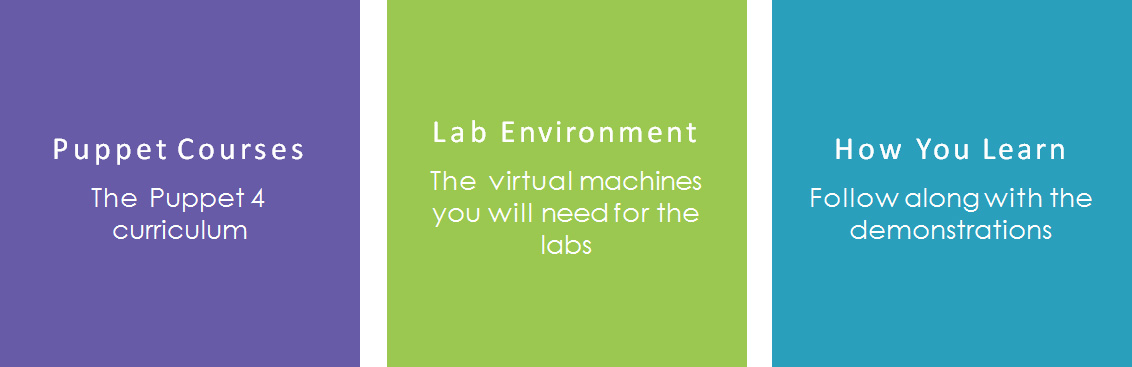
- Lab Environment
- Pluralsight Courses
- Course Contents
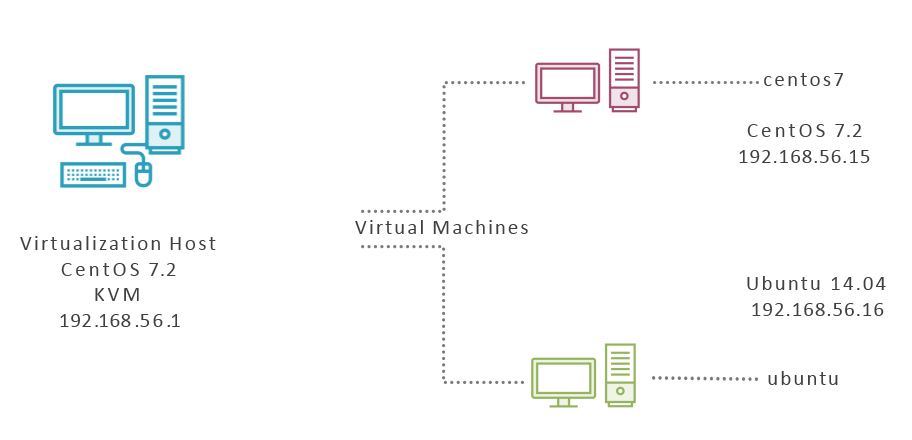
Lab Environment
Puppet 4 Series
This course follows on from the Puppet 4: Language Essentials and in this course you will learn to create Puppet Modules and use Puppet Classes. This will simplify your manifests and help make your code easier to maintain.
- Puppet 4: Language Essentials
- Puppet 4: Working with Modules and Classes
- Puppet 4: Working with Files and Templates
- Puppet 4: Hiera the Single Source of Truth
- Puppet 4: Server and Puppet Enterprise
Puppet 4: Working with Modules and Classes
Demo

Browsing the Puppet Forge
Summary
Puppet Forge
- https://forge.puppet.com
- Documentation
- Project URL
- puppet module install <module name>
Next up: Working with Puppet Environments
Working with Puppet Environments
Objectives
- What are Environments
- Creating an Environments
- Puppet Modules and Environments
Puppet Environments
The only default environment is Production but we may create more environments to isolate code between clients.
Puppet Environments
Discover Environments
sudo puppet module list
sudo puppet module install puppetlabs/ntp
sudo puppet module list
sudo puppet module uninstall puppetlabs/ntp
sudo puppet module install puppetlabs/ntp \
-i /etc/puppetlabs/code/modules
Modules and Environments
Puppet modules can be located in either the environment directory or a common shared directory. Modules that need to be accessed in more than one environment need to be installed into a common path.
Working with Modules and Environments
sudo mkdir -p \
 /etc/puppetlabs/code/environments/dev/{modules,manifests}

sudo puppet module install puppetlabs/ntp \
 --environment dev
Create an Environment
When installing modules if we have created custom environments we can install into the desired environment using the --environment option.
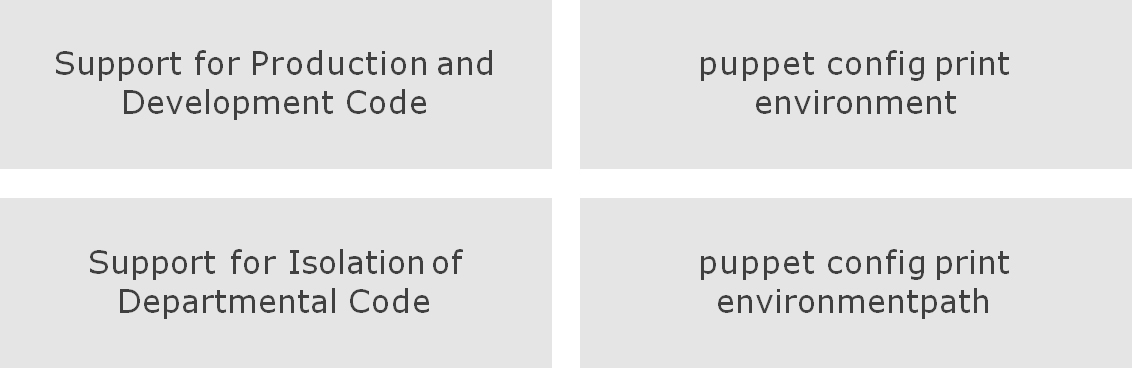
Create a Development Environment
- /etc/puppetlabs/code/environments
- /etc/puppetlabs/code/modules
- sudo puppet config print environment
- sudo puppet config set environment dev
Next up: Working with Modules
Working with Modules
Objectives
- Module Structure
- Manually Creating Modules
- Generating Modules
Puppet Modules
A Puppet module is simply a directory tree with specific and predictable content
<environment>/modules
ntp/
	manifests/init.pp
	files/
	lib/
	facts.d/
	templates/
	examples/
cd /etc/puppetlabs/code/environments/production/modules
sudo mkdir -p motd/{manifests,files,examples}Create Simple Module
We can create a simple module to show how they are populated and used.
cd /etc/puppetlabs/code/environments/production/modules
sudo vim motd/manifests/init.pp
class motd {
  file { ‘/etc/motd’:
	ensure  => ‘file’,
	content => file(‘motd/message’),
  }
}
Manifests
The <module>/mainifests/init.pp must contain a class with the same name as the module.
cd /etc/puppetlabs/code/environments/production/modules
sudo vim motd/files/message

Welcome to my server
Please play nicely
Files
The files directory can be used for file downloads or we can use the file function to copy the content of a file to a file resource. The function is used as: content => file(<module>/<files>/).
This relates to the path: <module>/<files>/<file>
cd /etc/puppetlabs/code/environments/production/modules
sudo vim motd/examples/init.pp
include motd
Examples
The examples directory can be used to show examples of module usage. The manifest name in not important but is often init.pp.
Create Simple Module
cd /etc/puppetlabs/code/environments/production/modules

sudo puppet module generate andrew/test
or
sudo puppet module generate andrew/test --skip-interview
Modules Metadata
Especially if modules are going to be longer lived, then we will also need to create metadata for our modules. We can create the files manually but we can use the puppet module generate command.
Generate Modules
<environment>/modules
<modulename>/manifests/init.pp
class motd {
}
content => file(‘motd/message’)
motd/files/message
puppet module generate user/module
Next up: Working with Puppet Classes
Working with Puppet Classes
Objectives
- Developing the NTP module
- Creating and using sub-classes
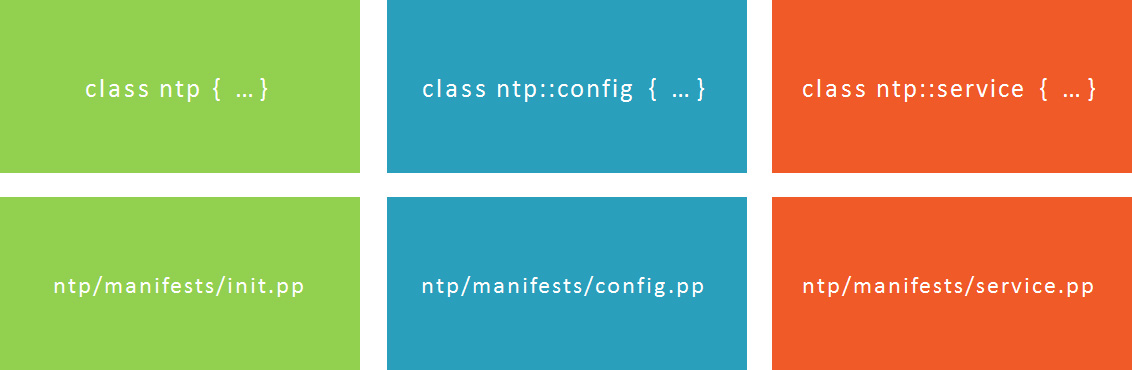
NTP Manifest
We have the NTP manifest from the previous Puppet 4: Language Essentials course. We can use this as our starting point for our NTP module.
cd /etc/puppetlabs/code/environments/production/modules
sudo mkdir -p ntp/{files,manifests,examples}
sudo cp ~/ntpfinal.pp ntp/manifests/init.pp
Add class detail to surround existing code
Step 1
We can take to existing manifest and copy it to the init.pp of a new module.
Remove file content from init.pp
Add to ntp/files/ntp.conf
Step 2
We can populate the ntp.conf using the file function.Create NTP Module
cd /etc/puppetlabs/code/environments/production/modules
sudo vim ntp/manifests/config.pp
class ntp::config {
…
}
Sub-Classes
We can create additional manifests with their own class definitions. These are known as sub-classes. The manifest name must match the class name. The double colon is used to separate name-spaces.
Create Sub-Classes
cd /etc/puppetlabs/code/environments/production/modules
sudo vim motd/files/message

Welcome to my server
Please play nicely
Files
The files directory can be used for file downloads or we can use the file function to copy the content of a file to a file resource. The function is used as: content => file(<module>/<file>).
This relates to the path: <module>/<file>/<file>
cd /etc/puppetlabs/code/environments/production/modules
sudo vim motd/examples/init.pp
include motd
Examples
The examples directory can be used to show examples of module usage. The manifest name in not important but is often init.pp.
cd /etc/puppetlabs/code/environments/production/modules
sudo puppet module generate andrew/test
or
sudo puppet module generate andrew/test --skip-interview
Modules Metadata
Especially if modules are going to be longer lived, then we will also need to create metadata for our modules. We can create the files manually but we can use the puppet module generate command.
Generate Modules

Sub-classes allow for us to abstract code to specific areas that they relate to, creating simpler code that is easier to maintain.
Classes and Manifests
Next up: Implementing Parameterized Classes
Implementing Parameterized Classes
Objectives
- Customizing input to classes
- Declaring classes with the include style and the resource style
- Validating input with standard library functions
Adding Flexibility
If we build in parameters to classes we can add flexibility to the code without having to write more classes or manifests.
Parameterized Classes
cd /etc/puppetlabs/code/environments/production/modules
sudo vim motd/manifests/init.pp
class motd ( $motd_message = ‘Daily’ ) {

   file { ‘/etc/motd’:
	ensure  => ‘present’,
	content => file(“motd/${motd_message}”),
   }
}
$motd_message #As no value is set this becomes a required
parameter that we must supply a value for when declaring the class
$motd_message = ‘Daily’ #As we have supplied a default
value the parameter is optional
String $motd_message = ‘Daily’ #We now enforce that the
supplied value must be a string.Input Parameters and Values
We can make parameters mandatory or optional choosing to supply a default value or not. More than one parameter can be required and they become comma separated.
Adding Parameters
include motd
#We cannot pass parameters directly. We either have to
accept the defaults or use external tools such as Hiera to
populate the parameters.
Declaring Classes with Include
As we have seen so far we can declare classes using include.
class { ‘motd’: }
#Use the default parameter values
class { ‘motd’:
  motd_message => ‘Weekly’,
}
#Pass parameter values directly.
Declaring Classes like a Resource
We can also declare classes like we would a resource. This becomes more flexible but we must make sure each class is declared just once as with a resource.
Passing Parameters to Classes
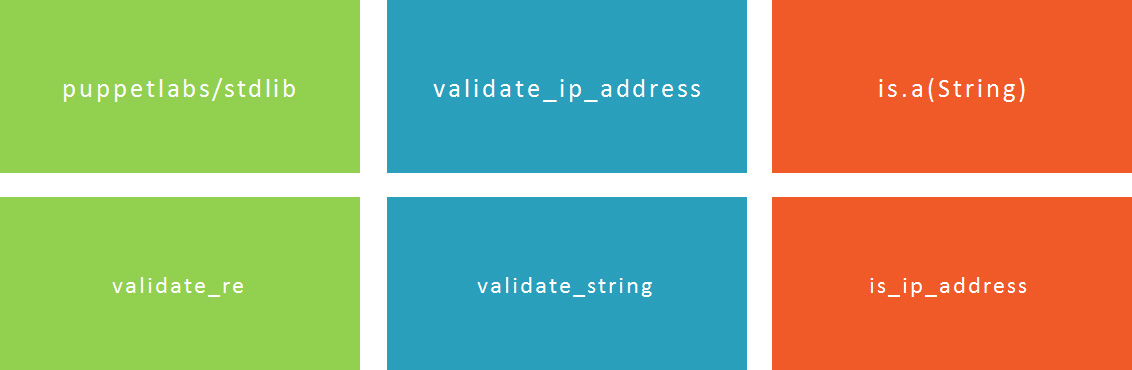
#validate_re(<string_to_test>,<regular_expresssion>)
$allowed_files = [ ‘^Daily$’, ‘^Weekly$’, ]
validate_re($motd_message, $allowed_files)
Validating Input
We can validate the input values using one of the many validation functions in the puppetlabs/stdlib. He we check the input against a list of allowed files.
Validating Input
Defining a class:
class motd { … }
Declaring a class using the include style:
include motd
Declaring a class using the resource style:
class { ‘motd’:
motd_message => ‘Daily’,
}
Defining a class with optional parameters:
class motd ( $motd_message = ‘Daily’){ … }
Defining a class with mandatory parameters:
class motd ( $motd_message ){ … }
Defining a class with many parameters:
class motd (
$motd_message,
$motd_enable,
){ … }
Validating Input
Questions !!